
Sales and marketing workflow
Swipe sideways to see the whole diagram →
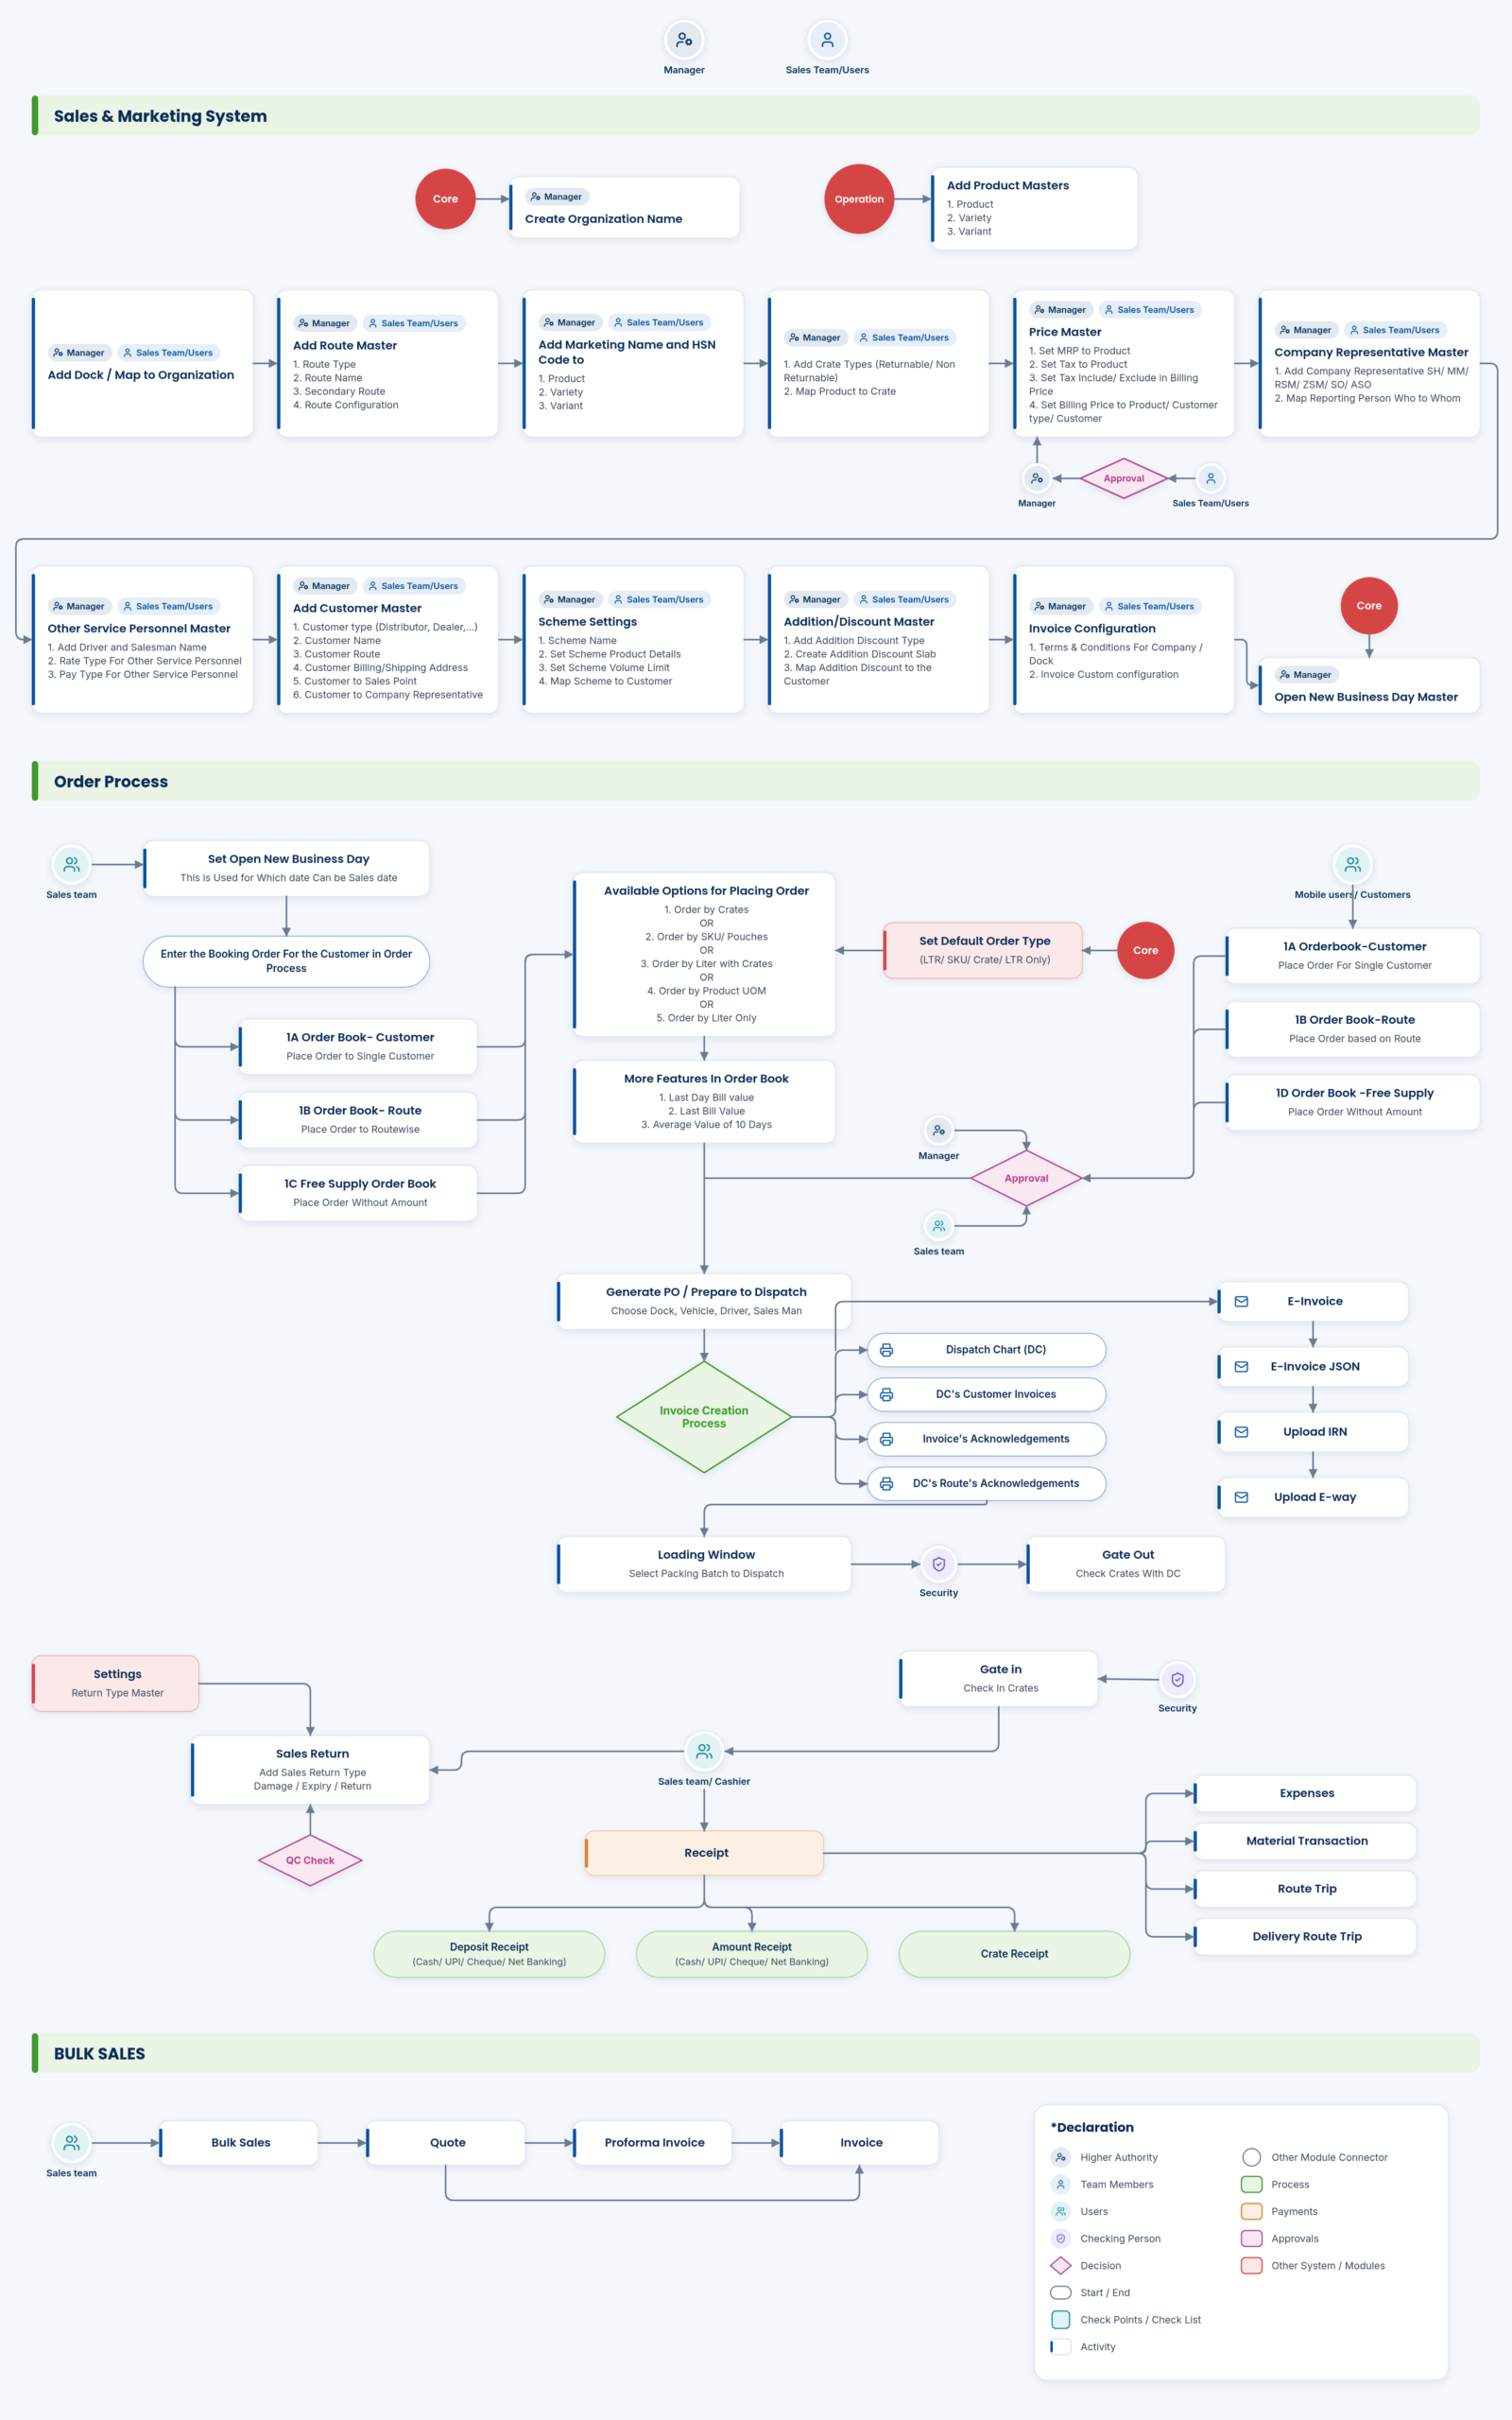
What these guides cover
Sales, orders, billing and GST
- Order books: Customer, route-wise and free-supply order books; place order book – customer / free supply
- Dispatch generation, DC and acknowledgements
- Gate in / gate out vehicle details with crate check
- Sales returns: Add sales return type; add sales return; QC check
- Cancellations: Cancel sales order, purchase order, invoice
- Company expenses, material transactions, route trips and delivery routes
- Sales masters (docs): Organisation unit; brand / product / variety / variant; dock; sales points; routes; HSN code and marketing name; product to crate; MRP; tax; billing price; company representative; other service personnel; customer, address, customer to sales point, address to representative; addition / discount and assignment; invoice configuration
Apps, downloads and resources
- Documentation / knowledge base: System overview, workflow (downloadable PDFs), how-to docs for procurement, sales, stores, HRMS; features and functional-area index
How-to guides
34 click-by-click guides. Each guide is shown below exactly as published on Scribe; open the step summary for a quick text version.
Add Organizational Unit
Open in Scribe ↗Step summary (text)
- Click “Core”
- Click “Organization Info”
- Click “Organizational Unit”
- Click “Add New”
- select the details like company name , branch , organization unit name and organization unit code .
- after filling the required fields , Click “Add”
Add New Brand , Product , Variety , Variant
Open in Scribe ↗Step summary (text)
- Click “Product Details”
- Click “Varient”
- Click “Variant”
- Click “Add New”
- Click “Bar Code”
- Click “Cancel”
- Click “Cancel”
Adding new dock
Open in Scribe ↗Step summary (text)
- sign in with your user ID and password
- Click “Sales & Marketing”
- Click “Settings”
- Click “Sales point”
- Click “Dock name”
- You can add new dock details using “Add New ” button
- Fill the required details like Organization unit name , Dock name , Start date and status . After filling the required field click “Add” button
Add New sales points
Open in Scribe ↗Step summary (text)
- If you want to add Dock Name , Click “Sales Points”
- Click “Dock Name”
- Click “Add New”
- Fill the details like Organization Unit Name , Dock name , Start date , notes , status .
- After filling all the required details Click “Add” . Your dock details are added successfully .
- If you want to add Branch Depot Warehouse , Click “Branch Depot Warehouse” on settings -> salespoint
- Click “Add New”
Add New Route
Open in Scribe ↗Step summary (text)
- For adding new route details , you need to add route type for that Click “Settings”
- Click “Route”
- Click “Route Type”
- Click “Add New”
- after clicking “Add New” fill the details like Route Type name , Route Type code , start date , notes , status .
- After filling all the required details Click “Add”
- You can view the added route type details on settings -> route -> route type . You can also edit the added route type details using “edit”
Add HSN Code
Open in Scribe ↗Step summary (text)
- Click “Operation”
- Click “Settings”
- Click “Product Details”
- Click “Hsncode”
- Click “Add New”
- Fill the fields like HSN Code , Start date , End date , Status .
- after filling the fields Click “Add ” and your HSN code is added successfully .
Add marketing name and HSN code
Open in Scribe ↗Step summary (text)
- If you want to add marketing product name and hns code for product , Click “Settings”
- Click “Product”
- Click “Product Details”
- Click “edit” on the product where you want to add marketing product name and HSN code for the product .
- Here you can add marketing product name and HNS code
- If you click the “edit button” on HNS code
- you can add new HSN code and edit the existing code .
Add Product to Crate
Open in Scribe ↗Step summary (text)
- Before mapping product to crate you need to add crate type for that , Click “Settings”
- Click “Crate”
- Click “Crate Type”
- Click “Add New”
- Here fill the crate details like crate type name , if you have the picture of crate type you can attach the picture using “select file” button
- If the product is returnable click “yes” on returnable else click “Yes” on non returnable .
- select the start date of the crate type , status
How to Add MRP
Open in Scribe ↗Step summary (text)
- select the dock and brand of what product you want to add the MRP
- Click “OK”
- Click “Add new”
- your dock name , variety name , variant name are automatically selected .
- if you need you can select product combo
- Fill the new MRP of the variant type and variety and if you need you can fill the MRP rate per litre , MRP rate per KG .
- after filling all the required details ,Click “Add” and your MRP details is added successfully .
Add Tax to MRP of the product
Open in Scribe ↗Step summary (text)
- Before adding tax , You need to add tax type for that Click “FRS”
- Click “Tax Type”
- Click “Add New”
- fill the details like Enter base tax type , started date , status
- after filling the details Click “Add ” and tax type is added successfully
- Click “Tax”
- Click “Add New”
How to Add a New Company Representative
Open in Scribe ↗Step summary (text)
- If you want to add company representative , you need to add company representative type for that Click “Settings”
- Click “Company Representative”
- Click “Company Representative Type”
- Click “Add New”
- Fill the details like company representative type , volume report to , amount report to ,crate report to , attendance report to , start date , status and approval level
- After filling all the fields click , Click “Add ” . your company representative type is added successfully
- Click “Settings”
Add Other Service Personnel
Open in Scribe ↗Step summary (text)
- before adding other service personnel , you need to add other service personnel type for that Click “Settings”
- Click “Other Service Personnel”
- Click “Other Service Personnel Type”
- Click “Add New”
- fill the details like other service personnel type , start date , notes and click yes on particular pay type by which you can add payment type for the other service personnel type
- After filling the required fields Click “Add ” and your other service personnel type is added successfully .
- After adding other service personnel type , Click “Other Service Personnel” on settings -> other service personnel
Add New Customer Details
Open in Scribe ↗Step summary (text)
- Sign in with your user ID and Password .
- Click “Sales & Marketing”
- Before adding customer you need to add “customer type” , for that Click “Settings”
- Click “Customer”
- Click “Customer Type”
- Click “Add New”
- Click “Customer Type Code”
Adding Customer Address
Open in Scribe ↗Step summary (text)
- Click “Settings”
- Click “Customer”
- Click “Customer Address”
- Click “Add New”
- Enter the Customer Name , For who you want to add the Address Details.
- fill the address details like address type , Billing / Shipping personnel name , Billing / shipping address Alias , address 1 ,pincode ,start date , notes
- also fill the Latitude , Longtitude , Country , State , City , Area
Add Customer to Sales Point
Open in Scribe ↗Step summary (text)
- Click “Settings”
- Click “Customer”
- Click “Customer to Sales Point”
- Click “Add New”
- Select the sales point type (For example , If you select “dock” you can able to select the dock name below) , customer name , start date , status and notes if necessary .
- after entering the details , Click “Add” and your customer is assigned to sales point successfully .
How to Add Customer Address to Company Representative
Open in Scribe ↗Step summary (text)
- Click “Customer”
- Click “Customer Address to Representative”
- Click “Add New”
- Fill the Customer name and their Address , Route name . After that select the officer details like Sales officer , Area Sales Manager , Zone Sales Manager , Sales Head .
- Also select the Area Sales Officer , Regional Sales Manager and Marketing Manager
- Select the Start Date and Status and fill Notes if necessary .
- After filling the fields click “Add” and your customer address is assigned to company representative Successfully .
Adding Addition / Discount
Open in Scribe ↗Step summary (text)
- after filling the product details Click “Configuration”
- if you need litre per bill click “yes” on litre per bill
- If you click “yes” on litre per bill , you need to fill the details of average litre per day for and average litre per bills for .
- If you want to add attachment , Click “select file”
- Select the Start date and the End date of the addition / discount
- If you Click “Preview” you can view the preview of the addition / discount details
- After filling all the details Click “Add New” and your addition / discount details are added successfully
Map addition or discount
Open in Scribe ↗Step summary (text)
- select the addition / discount name that you have created .
- after selecting addition / discount name fill the mapping details like Route name , customer name and customer type
- on release by limit , fill the redeem after days , Redeem after amount .
- On “Release Calculated Addition / Discount Amount Based On” , if the calculated amount is based on per bill click “yes” on per bill , or if the calculated amount is based on per day click “yes” on per day
- On release option , if the amount want to pay once per day click “yes” on pay once per day , if you want to calculate both fat and rate per litre click “yes” on calculate both fat and rate per litre , If you want to accumulate and release click “yes” on accumulate and release , fill the to be release amount in percentage of invoiced amount , if the calculated amount want to be calculated once per day click “yes”
- select the start date and status
- After filling all the required details Click “Add ” and your mapped addition or discount details is added successfully .
Add invoice configuration
Open in Scribe ↗Step summary (text)
- Click “Configuration Settings”
- Click here.
- if you need to display the organization name and company name on the invoice click “yes” on both or click “yes” on the particular name which you want to display .
- select the start and date of the invoice and status on mapping details you can map the invoice configuration to a particular dock (or) organization unit (or) customer type (or) route (or) customer.
- if you click “add more mapping”
- you can map the invoice configuration to a particular branch/depot/warehouse (or) Factory outlet (or) delivery route (or) customer bill desk
- after filling the details Click “Add” and invoice configuration is added successfully.
Place an Order
Open in Scribe ↗Step summary (text)
- Click “Order Process”
- Click “1A . Order Book – Customer”
- select the route name
- select the name of the customer
- If you click “daily” . The order will be processed for all days when ever a PO is Raised
- If you click “Adhoc \ Special Order” the Order will be processed only for the specified Date”
- if you click “order plan” you can add special Order Plan for Multiple dates
Placing Order Book – Free Supply
Open in Scribe ↗Step summary (text)
- Click “1C. Order Book – Free Supply”
- select the route
- Select the customer
- Click “load”
- provide Crates ‘+’ Extra Pouches in input field
- enter the crate quantity on the product for the customer order .
- After filling the Product Order Quantity click “save” and the order book – free supply details is added successfully .
Generating Dispatch
Open in Scribe ↗Step summary (text)
- Click “Order Process”
- Click “2 . Prepare to Despatch”
- select the check box of the details of the purchase order
- Click “Generate Dispatch”
- fill the details like vehicle number , sales man ,driver name , route and you want to select the sales point and dispatch window name
- After selecting all the required details , Click “Add”
- You can add extra crate given to details on extra crate details below
Invoice generation
Open in Scribe ↗Step summary (text)
- Click “Order Process”
- Click “3 . DC Details”
- If you want to print the DC invoice click “DC Invoice Print”
- If you want to print the DC click “DC Print”
- If you want to print invoice acknowledgement click “invoice acknowledgement”
- If you want to print DC route acknowledgement click “DC route acknowledgement”
Add Gate in
Open in Scribe ↗Step summary (text)
- Click “Add”
- After click “Add” you need to insert the In Crate Type , In crate for that Click “Add New” below
- select the in crate type
- enter the in crate amount
- Type the notes if necessary
- select the start date
- Click “Add New” and your Gate In details are added successfully
Add Gate out
Open in Scribe ↗Step summary (text)
- Click “Order Process”
- Click “5A . Gate Out”
- Click “Add New”
- Select the DC id , Vehicle Name , Dock name , Start date , status .
- Also fill the Route Trip , Route Name , Start Km and notes if necessary .
- After filling all the fields , Click “Add”
- Click “Add New”
Add Sales Return type
Open in Scribe ↗Step summary (text)
- before adding sales Return you need to add sales order type for that , Click “Settings”
- Click “Other”
- Click “Sales Return Type”
- Click “Add New”
- Fill the fields like sales return type name ,start date and status .
- After filling the fields , Click “Add” and sales return type is added successfully .
Add Sales Return
Open in Scribe ↗Step summary (text)
- Click “Order Process”
- Click “Sales Return”
- Click “Add Sales Return”
- select the sales order number and click “ok” .
- Click “OK”
- Click here.
- select the return type that you have added .
Add Expense
Open in Scribe ↗Step summary (text)
- Before adding expenses , You need to add expenses type for that Click “Settings”
- Click “Company Activity & Expenses”
- Click “Expense Type”
- Click “Add New”
- Fill the details like expenses type , expenses sub type . if the expenses is by commute then click “yes” on “Is This Commute” , if the expenses is by new lead then click “yes” on is this new lead , if the expenses is by clint visit then click “yes” on is this client visit .
- After filling the details Click “Add ” and your expenses type is added successfully .
- after adding expense type , Click “Expenses” on Receipts
Add Material Transaction
Open in Scribe ↗Step summary (text)
- Click “Receipts”
- Click “Material Transaction”
- Click “Add New”
- select the material type , material transaction type , organization unit , dock .
- also select the branch depot warehouse , factory outlet , route ,delivery route .
- fill the quantity and select the UOM
- fill the starting batch no and serial no
Add Route Trip
Open in Scribe ↗Step summary (text)
- Click “Route Trip” on “receipts”
- Click “Add New”
- select the dock name , route configuration , route name , buzz date .
- fill the start and end KM forward and reverse covered KM
- select the start date and and status .
- Using “forward sequence”
- you can add forward customer sequence by selecting the customers on the sequence and click “add”
How to Add a New Delivery Route
Open in Scribe ↗Step summary (text)
- Click “Order Process”
- Click “Receipts”
- Click “Delivery Route Trip”
- Click “Add New”
- Fill the details like Delivery Route Config Id , Organization Unit Name , Dock Name , Branch Depot Warehouse Name , Fac Outlet , Route Name Delivery Route Name .
- Fill the staff details like Delivery Route Staff , Driver Name , Sales Man Name , Combined Name .
- Fill the other details like bill devices , customer sequence , route point sequence .
Canceling an order
Open in Scribe ↗Step summary (text)
- Click “Order Process”
- Click “Cancel Orders”
- Click “Cancel – Order Book”
- Click the Cancel Order Book to cancel the order that you have given
- A dialog box is shown with a message “Cancel Order Book” click “OK” and your particular order book is canceled successfully .
- You can Click “Cancel/Import” button to import the order details of a particular date
Cancel a Purchase Order
Open in Scribe ↗Step summary (text)
- Click “Order Process”
- Click “Cancel Orders”
- Click “Cancel – Purchase Order”
- Click the checkbox of the purchase order which you want to cancel
- Click “Cancel PO”
- Fill the reason for cancelling the purchase order .
- After filling the reason click “ok” and your purchase order will be deleted successfully
Cancel an Invoice
Open in Scribe ↗Step summary (text)
- Click “Order Process”
- Click “Cancel Orders”
- Click “Cancel – Invoice”
- Click the check box of the invoice details which you want to cancel .
- after selecting the invoice details , Click “Cancel Invoice”
- Enter the reason to cancel the invoice
- After entering the reason , Click “OK” and your invoice is cancelled successfully .
The sales set-up, step by step
On this page
Masters1. Organisation, products, docks and routes
Add the organisational unit under Core, then brands, products, varieties and variants with bar codes, HSN codes and marketing names. Add docks, branches, depots and warehouses as sales points, and route types and routes.
Crate types are added and products mapped to crates.
Customers2. Customers, representatives and prices
Add customer types, customers, addresses and the customer-to-sales-point mapping; add company representatives and other service personnel. Add the tax type and tax, the MRP per dock and variant, and additions and discounts with their mapping.
Invoice configuration decides what prints on the invoice.
Daily3. Orders, dispatch, invoices and returns
Place orders in the order book, including free supply; generate dispatch; record gate out with the DC, vehicle and route trip; print the DC and invoice. Route trips record the customer sequence and kilometres.
Returns are recorded against the sales order; orders, purchase orders and invoices are cancelled with a reason; expenses and material transactions are entered in receipts.
Keep exploring at your own pace
Every module page walks through the screens, reports and mobile apps in the same way, so you can see exactly how EasyDairyERP fits your dairy.
When you have seen enough, we are happy to show it to you live on our sample data: book a demo or call +91 94880 59495.