
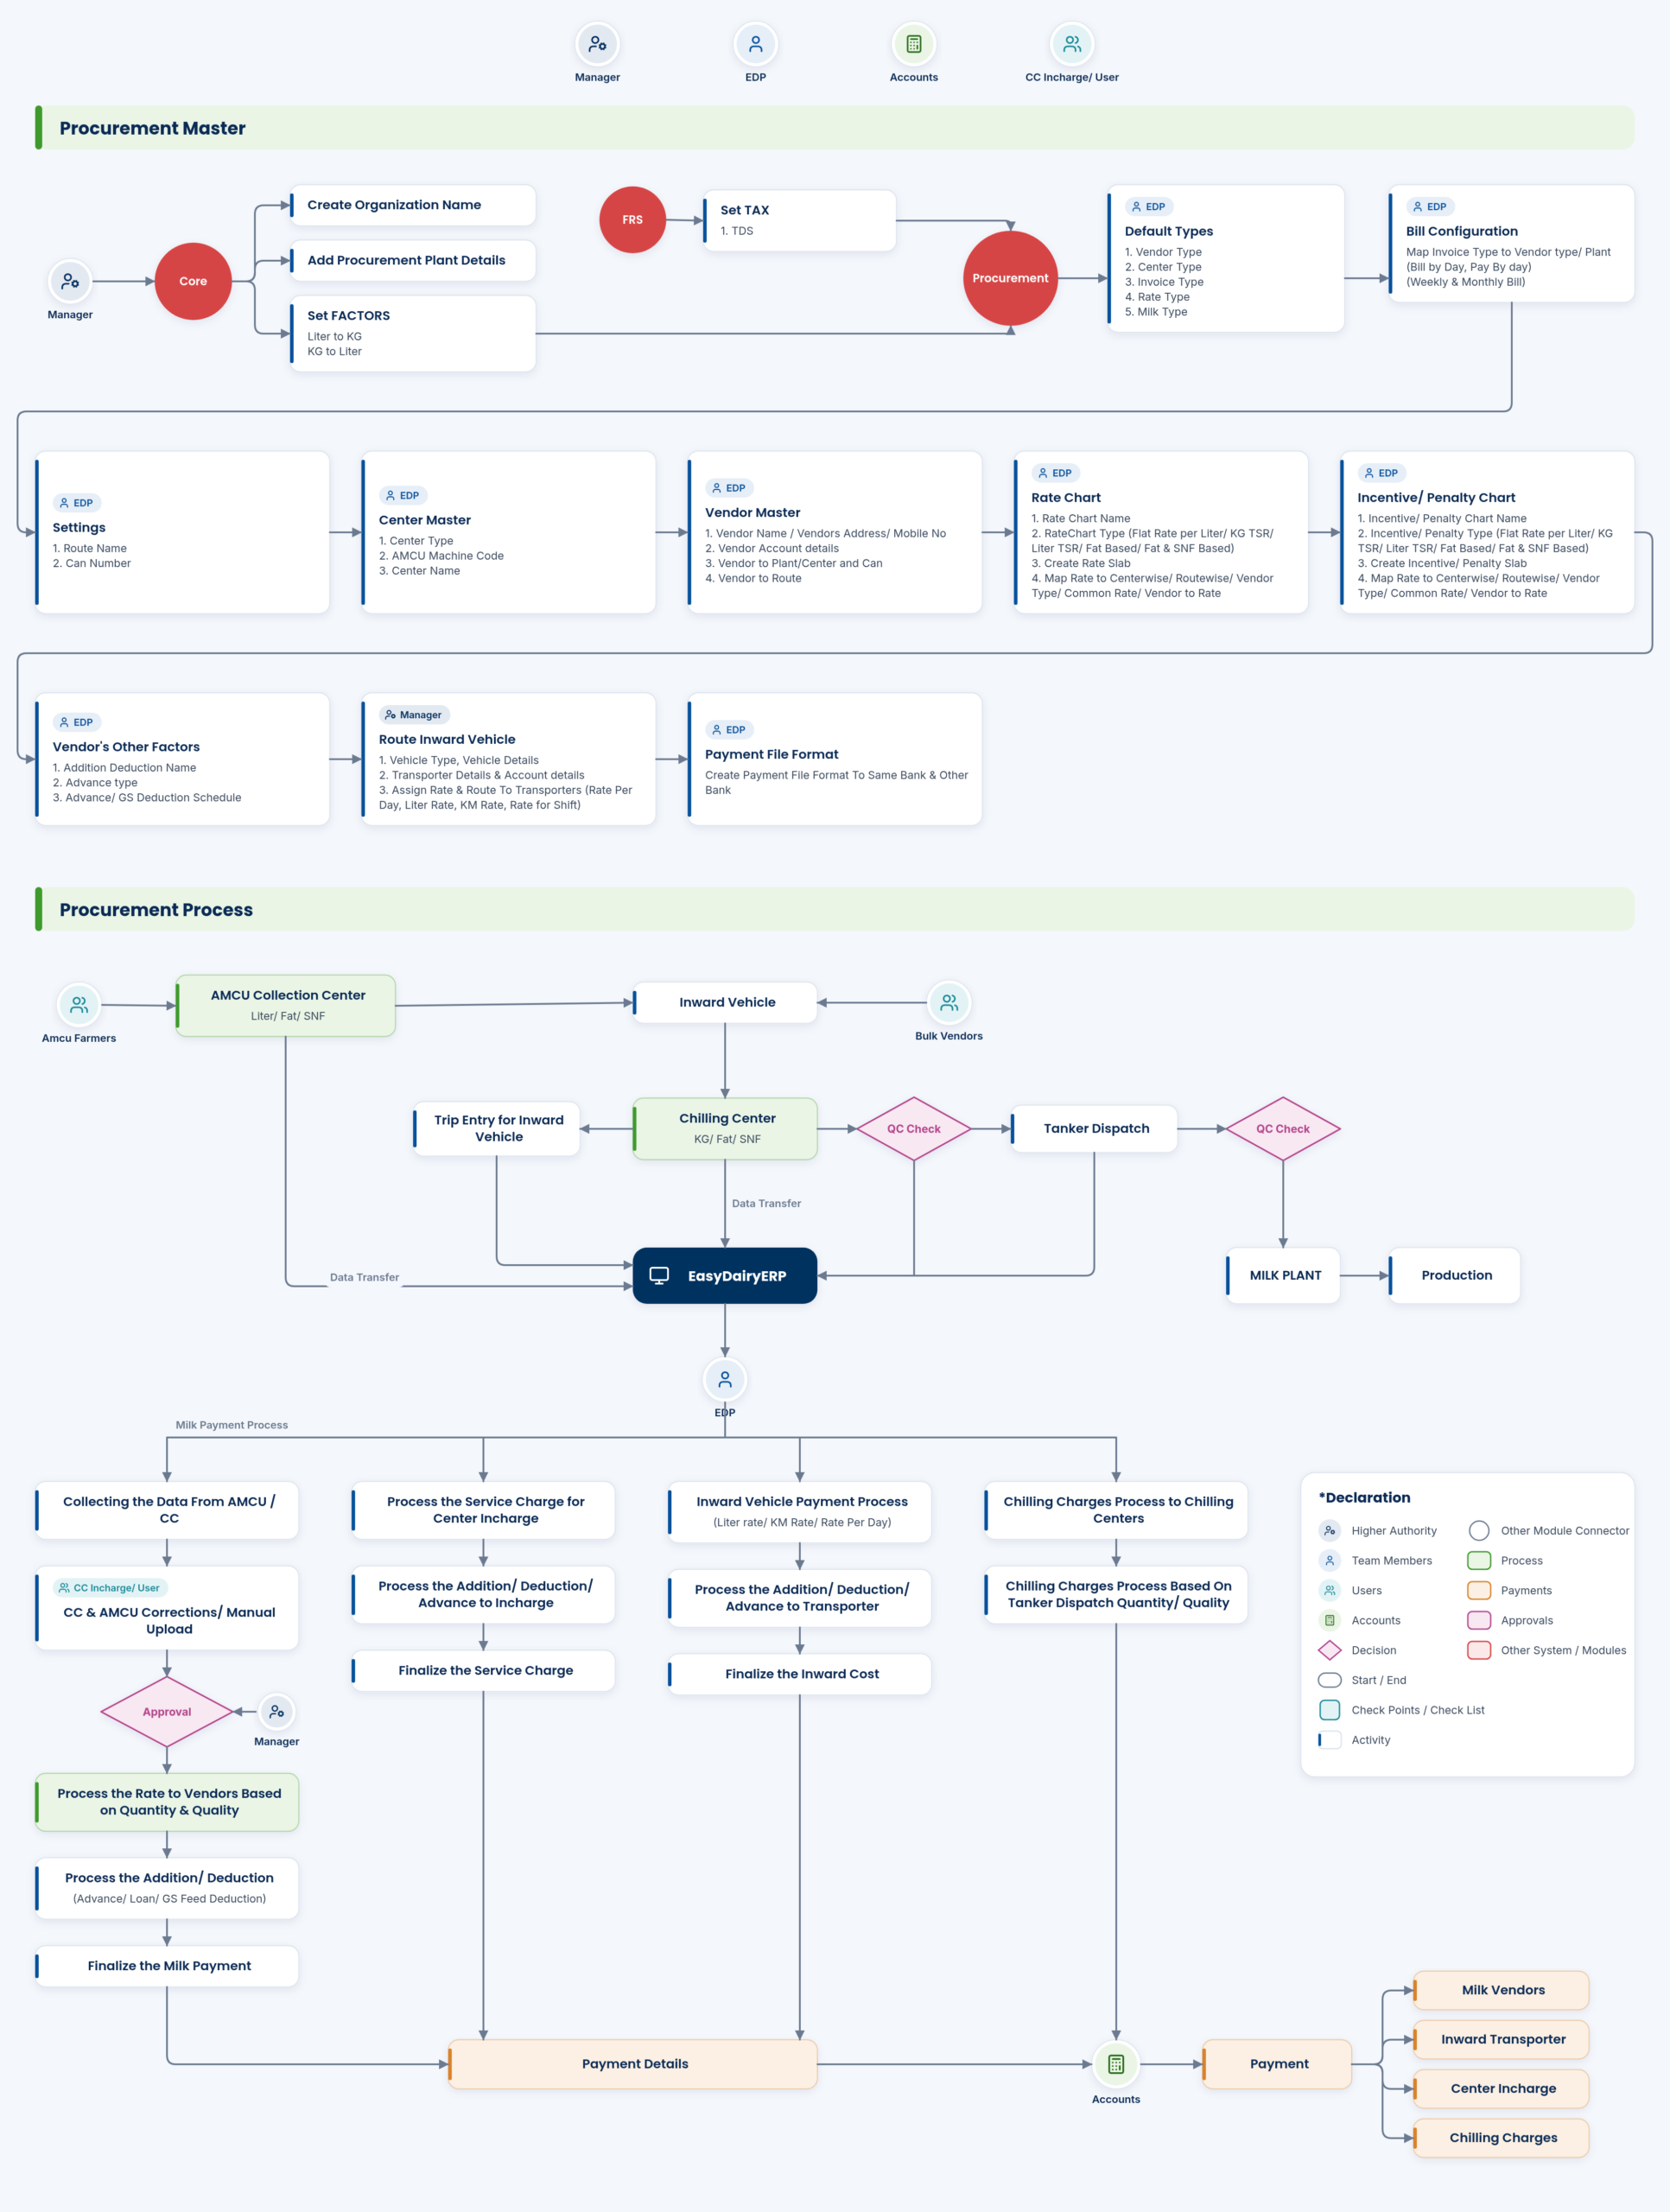
Procurement workflow
Swipe sideways to see the whole diagram →
What these guides cover
Rate charts, billing and payments
- Rate chart mapping: Fat / SNF rate; rate chart details; vendor-to-rate-chart, vendor type and vendor (route-wise) mapping
- Incentive / penalty charts: Add incentive or penalty chart; assign common or to a vendor
- Additions, deductions, loans, advances, bonus: Reflected in the individual farmer bill; add / assign addition-deduction chart; assign advance; advances screen
- Billing in your cycle: by day, weekly, every ten days, fortnightly or monthly
- Service charges for procurement in-charge (VLCC service charge): Generate service charges; assign VLCC service charge to vendors; process, adjust and finalise service charge
- Plant or centre invoice: Step-by-step guide: add plant or centre invoice to vendor
- Vendor / farmer / producer master: Step-by-step guide: add vendor | farmer | producer
Sales, orders, billing and GST
- Bulk sales: Quote, proforma invoice, invoice
- Rate control, multiple pricing options: Litre-, crate-, customer-, route-based; price master with approval
- Four order screen types: Crates, SKUs, litres with crates, litres
- Order books: Customer, route-wise and free-supply order books; place order book – customer / free supply
- Customer sales average for quick quantity billing
- Open new business day; anytime day closure; invoice date forwarding
- Dispatch generation, DC and acknowledgements
- E-invoice automatic API; e-way bill
- Gate in / gate out vehicle details with crate check
- Schemes (free product on billed product); scheme control
- Receipts and deposits: Cash, online, DD, cheque; deposit handling; cheque handling; deposit / amount / crate receipts
- Sales returns: Add sales return type; add sales return; QC check
- Company expenses, material transactions, route trips and delivery routes
- Sales masters (docs): Organisation unit; brand / product / variety / variant; dock; sales points; routes; HSN code and marketing name; product to crate; MRP; tax; billing price; company representative; other service personnel; customer, address, customer to sales point, address to representative; addition / discount and assignment; invoice configuration
Village milk collection and analysers
- Automatic upload to your main server from collection-centre equipment via FTP or API, behind a firewall
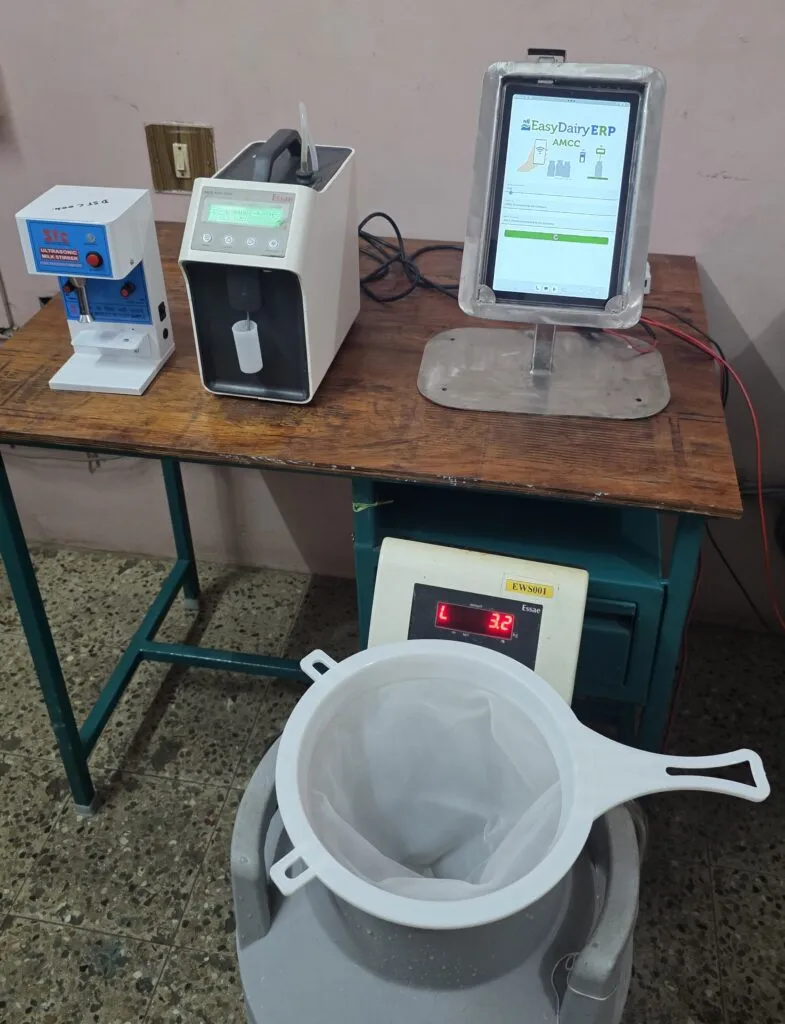
- Add Village Collection Center (VLCC / AMC): Step-by-step guide: society / village-level centre set-up; group of farmers; in-charge collects, tests on dairy-provided equipment, consolidates and sends to plant / CC
- TAB-based automated milk collection centre: Docs workflow heading ‘With TAB based Automated Milk Collection Center For Milk data Capture from Villages’
Chilling centres and milk reception
- Add Plant / CC and plant contract: Step-by-step guide: add a plant / CC; add plant contract details
- CC lab test set-up: Step-by-step guide: add lab test / CC lab test details
Milk transport and field operations
- Vehicle, transporter and route set-up: Step-by-step guide: add vehicle and transporter details, route details, assign transporter to vehicles; route inward vehicle master (vehicle type, transporter account, rate per day / litre / KM / shift)
Field force and the sales app
- Customer order ASO approval; order deviation approvals
Apps, downloads and resources
- Documentation / knowledge base: System overview, workflow (downloadable PDFs), how-to docs for procurement, sales, stores, HRMS; features and functional-area index
How-to guides
17 click-by-click guides. Each guide is shown below exactly as published on Scribe; open the step summary for a quick text version.
Adding new plant
Open in Scribe ↗Step summary (text)
- Sign in with your user ID and Password
- Click “Procurement”
- Click “Chilling Center 1”
- Click “OK”
- Click “Settings”
- Click “Plant”
- Click “Plant Details”
Add New Contract details of plant
Open in Scribe ↗Step summary (text)
- If you want to add contract details of the plant , you need to add contract type . For that Click “Settings”
- Click “Plant”
- Click “Contract Type”
- Click “Add New”
- Fill the required fields like Contract Type Name , Start name , Status and notes if necessary
- After filling the fields , Click “Add”
- After adding the contract type , Click “Data Process”
Add a New Center
Open in Scribe ↗Step summary (text)
- sign in with your user ID and password
- Click “Procurement”
- Click “Chilling Center 1”
- Click “OK”
- Click “Settings”
- Click “Center”
- Click “Add New”
Adding Vendor Details
Open in Scribe ↗Step summary (text)
- Sign in with your user ID and Password
- Click “Procurement”
- Click “Chilling Center 1”
- Click “OK”
- Click “Settings”
- Click “Vendor”
- Click “Vendor Details”
Process SMS to vendor
Open in Scribe ↗Step summary (text)
- For processing SMS to vendor you need to add the SMS format , For that Click “Settings”
- Click “SMS Format”
- Click “Add New”
- select the values for the sms format
- and click the small arrow to confirm the selected values
- type the format name and the format will be displayed on the output
- select start date of the SMS format
Adding Vehicle and Transporter details
Open in Scribe ↗Step summary (text)
- sign in with your user ID and Password
- Click “Procurement”
- Click “Chilling Center 1”
- Click “OK”
- Click “Settings”
- Click “Route”
- Click “Vehicle Type”
Add Lab Test
Open in Scribe ↗Step summary (text)
- Click “Data Process”
- Click “Lab Test”
- Click “Add New”
- select the required fields like plant name , organization unit ID , Test Started at , Test Ended at , CC milk source . If the sample was composite sample click “yes” on composite sample else click “yes” on individual sample
- And also select the date of the Lab Test , Shift , Analyzer Sample Number , Route , Vendor Type , Vendor ,Center Name , Can No , Center Type .
- after filling all the required details click “add”
- after adding Click “Add New” on the below
Adding new Rate Chart
Open in Scribe ↗Step summary (text)
- sign in with your user ID and Password
- Click “Procurement”
- Click “Chilling Center 1”
- Click “OK”
- Click “Settings”
- Click “Charts”
- Click “Rate chart”
Adding Rate chart for Common
Open in Scribe ↗Step summary (text)
- Select the rate chart name that you have created .
- You can add rate chart for particular vendor type by selecting the vendor type on “For vendor type”
- You can add rate chart for particular center by selecting the center on “For center”
- You can add rate chart for particular plant by selecting the plant on “For plant”
- You can add rate chart for particular route by selecting the route on “For route”
- Select the start date for the rate chart
- After filling all the required fields Click “Add” and your rate chart is added for common successfully
Adding rate chart to a particular vendor
Open in Scribe ↗Step summary (text)
- sign in with your user ID and Password
- Click “Procurement”
- Click “Chilling Center 1”
- Click “OK”
- If you want to add rate chart to a particular vendor , Click “Settings”
- Click “Vendor to Rate”
- Click “Add Rate to Vendor – non Center Based”
Adding Addition / Deduction and assigning to vendor
Open in Scribe ↗Step summary (text)
- Sign in with your user ID and password
- Click “Procurement”
- Click “Chilling Center 1”
- Click “OK”
- On Settings Click “Addition Deduction Chart”
- Click “Add New”
- Fill the required fields like addition deduction chart name , addition deduction name . select the milk type , shift name and start date of the addition / deduction chart . after filling all the required fields click “Add”
Adding incentive / penalty chart
Open in Scribe ↗Step summary (text)
- Sign in with your mail ID and password
- Click “Procurement”
- Click “Chilling Center 1”
- Click “OK”
- Click “Settings”
- Click “Charts”
- Click “Incentive / Penalty Chart”
Add Incentive/Penalty to a Vendor
Open in Scribe ↗Step summary (text)
- The vendor names will be appeared on the drop down , select the particular vendor for who you want to assign the incentive or penalty chart.
- select the “Incentive or penalty chart name”
- Select the milk type.
- select the shift of the vendor
- select the chart priority of the vendor.
- select the start date and the end date of the incentive or penalty chart
- after selecting all the fields , Click “Add”
VLCC Service Charge Mapping
Open in Scribe ↗Step summary (text)
- sign in using your user ID and Password
- Click “Procurement”
- Click “Chilling Center 1”
- Click “OK”
- Click “Settings”
- Click “VLCC Service Charge Mapping”
- Click “Add New”
Assign advance to vendor
Open in Scribe ↗Step summary (text)
- Click “Assigning Advance”
- Click “Add New”
- Fill the required fields like route name , advance name ,advance type from bank name , from organization unit name , from plant name , from bank amount, from org unit amount
- And Also fill the vendor name for who you are giving advance , vendor type , schedule name , total advance amount , int per annum , total interest , Total due amount , no of dues , final due date ,due amount
- If you want to add the application attachment you can add using select file option and you can also add approval attachment using select file option
- You also need to fill the advance proposed by ID and timestamp , primary approval by and timestamp , secondary approval id and timestamp , final approval ID and timestamp and start and end date of the advance .
- After filling all the required field Click “Add “
Bill Configuration
Open in Scribe ↗Step summary (text)
- Click “Settings”
- Click “Bill Configuration”
- Click “Add New”
- Click “Add New”
- Fill the plant details like Plant Name , Vendor Type name , Route name , Center Type name , Bill Configuration name . If there is break on month end Click “yes”
- Fill the bill paying details like bill by days , days to pay , bill on day of weeks days of week to pay .If you need monthly bill click “yes” on monthly bill .
- fill the status details like invoice type ID , start date of the bill configuration , notes , status
Add plant or center invoice
Open in Scribe ↗Step summary (text)
- Click “Bill Process”
- Click “Final Bill Process”
- Click “Plant / Center Invoice”
- Click “Search”
- Click “Add New”
- fill the required fields like plant name, Route Name , Center Type , Center , Vendor Type , Vendor , Bill period start date , Bill Period end date , Bill period start shift , Bill period end shift.
- after filling all the required details , Click “Add “
The procurement set-up, step by step
On this page
Masters1. Plants, centres, vendors and transport
Sign in, open Procurement and choose the chilling centre. Under Settings, add the plant, the centres and the vendors with their details; add vehicle types, vehicles and transporters under Route.
Plant contract types and contract details are added before plant invoices.
Prices2. Rate charts, incentives and deductions
Create the rate chart, then map it to a vendor type, centre, plant, route or a particular vendor with a start date. Incentive and penalty charts are created and assigned per vendor, milk type, shift and priority; addition and deduction charts are created and assigned to vendors, with bulk upload.
Advances are assigned to vendors, and the VLCC service charge is mapped.
Billing3. Bill configuration, lab tests and invoices
Bill configuration sets the bill cycle and print options. Lab tests are added under Data Process with the plant, unit, date, shift and analyser sample number. Plant and centre invoices are added under Bill Process → Final Bill Process.
SMS to vendors is processed from the bill process.
Keep exploring at your own pace
Every module page walks through the screens, reports and mobile apps in the same way, so you can see exactly how EasyDairyERP fits your dairy.
When you have seen enough, we are happy to show it to you live on our sample data: book a demo or call +91 94880 59495.